npm install -D webpack webpack-cli일반적으로 webpack이랑 webpack-cli 같이 설치한다.(안그러면 build때 오류발생할거다)
webpack: 모듈 번들링을 수행하는 라이브러리.
webpack-cli: 웹팩의 명령어를 실행할수 있게 해주는 도구.
npm install -D babel-loader @babel/core @babel/preset-env @babel/preset-react# babel-loader
-웹팩에서 사용되는 로더 중 하나.
-ES6 문법으로 작성된 코드를 ES5문법으로 변환시켜주는 로더이다.
# babel/core
-바벨을 이용해서 코드를 변환하는 데 필요한 기능들을 제공하는 중추같은 애다.(필수적으로 깔아야되는)
-트랜스파일러라고도 부른다.
-트래스파일러: 같은언어지만 문법적으로 변환해주는 도구.
# babel/preset-env
-바벨의 프리셋중 하나이다.
-env 플그인 개발패키지같은거다.
# babel/preset-react
-리액트 변환할때 필요한 플러그인들 패키지로 묶어둔거.
이제 webpack.config.js파일을 하나 만든다.
//webpack.config.js

const path = require("path");

module.exports = {
    entry: './src/index.js',              //시작하는 지점
    output: {
        path : path.resolve(__dirname, 'dist'),
        filename: "app.bundle.js"
    },
    module: {
        rules: [
            {
                test: /\.js$/,
                exclude: /node_modules/,
                use: {
                    loader: "babel-loader",
                    options: {
                        presets: [
                            ["@babel/preset-env"],
                            ["@babel/preset-react", {runtime: "automatic"}]  //runtime저거는 거의 필수옵션. 저거 안하면 하얀백지나올거다.
                        ]
                    }
                }
            }
        ]
    }
}
package.json가서 build입력해준다.
//package.json

 "scripts": {
    "build": "webpack",      //이부분 추가해주기
    "start": "react-scripts start",
    "build": "react-scripts build",
    "test": "react-scripts test",
    "eject": "react-scripts eject"
  },
이렇게 하고 npx webpack햇는데 css때문에 에러난다.!!
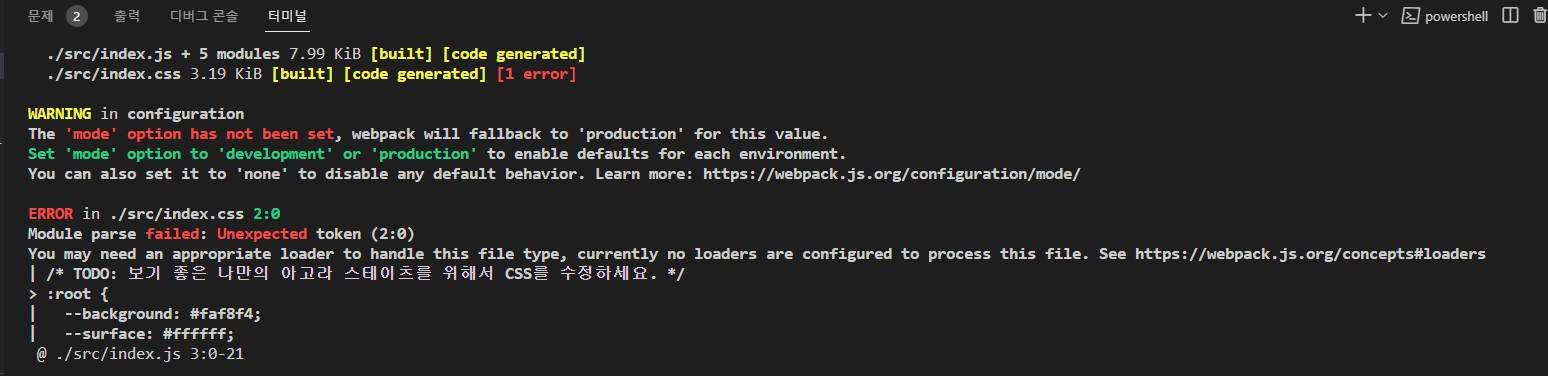
그래서 이거 입력해준다.
npm install -D css-loader style-loaderwebpack.config.js가서 나머지부분 설정해주자. (CSS부분추가)
const path = require("path");

module.exports = {
    entry: './src/index.js',              //시작하는 지점
    output: {
        path : path.resolve(__dirname, 'dist'),
        filename: "app.bundle.js"
    },
    module: {
        rules: [
            {
                test: /\.js$/,
                exclude: /node_modules/,
                use: {
                    loader: "babel-loader",
                    options: {
                        presets: [
                            ["@babel/preset-env"],
                            ["@babel/preset-react", {runtime: "automatic"}]  //runtime저거는 거의 필수옵션. 저거 안하면 하얀백지나올거다.
                        ]
                    }
                }
            },
            {
                test: /\.css$/,
                exclude: /node_modules/,
                use: ["style-loader", "css-loader"]
            }
        ]
    }
}
그리고 서버켜고 client에서 npx webpack하니까 app.bundle.js 파일 생성됬다.
이제 플러그인 깔아줄거다
npm install -D html-webpack-plugin플러그인은 위에서 따로 require로 불러와야 한다.
*로더는 일반적으로 모듈 번들링의 일부로 사용되는 애다. 따로 불러오지 않아도 웹팩이 자동적으로 인식을 하고 지가 알아서 로딩하고 적용을 한다.
*플러그인은 빌드하는 프로세스에 추가적으로 기능을 제공해주는애다. 추가적인애라서 웹팩이 인식할수있게 require로 넣어줘야한다.
const HtmlWebpackPlugin = require("html-webpack-plugin");

//추가적인거라서 밑의 코드는 module밖에 써야한다.
plugins: [
        new HtmlWebpackPlugin({
            template: path.resolve(__dirname, "public", "index.html")
        })
    ]
const path = require("path");
const HtmlWebpackPlugin = require("html-webpack-plugin");
module.exports = {
entry: './src/index.js', //시작하는 지점
output: {
path : path.resolve(__dirname, 'dist'),
filename: "app.bundle.js"
},
module: {
rules: [
{
test: /\.js$/,
exclude: /node_modules/,
use: {
loader: "babel-loader",
options: {
presets: [
["@babel/preset-env"],
["@babel/preset-react", {runtime: "automatic"}] //runtime저거는 거의 필수옵션. 저거 안하면 하얀백지나올거다.
]
}
}
},
{
test: /\.css$/,
exclude: /node_modules/,
use: ["style-loader", "css-loader"]
}
]
},
plugins: [
new HtmlWebpackPlugin({
template: path.resolve(__dirname, "public", "index.html")
})
]
}
npx webpack 치니까 dist폴더에 index.html이 생겼다.
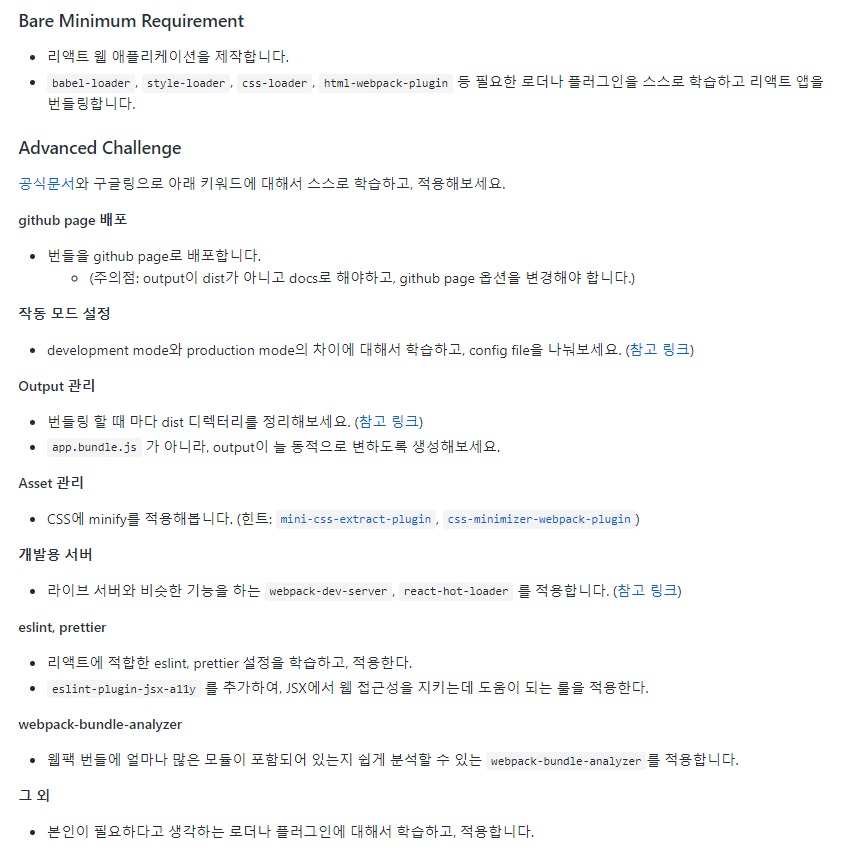
이렇게하면 기본적인건 끝! (베어미니멈 끝)
< github 배포 >
# dist폴더명 -> docs로 변경해줘야한다.
그리고 npx webpack하면 docs파일 생긴다.
# .gitignore설정해줘야한다.

저기 첫번째에 뜬 곳 들어간다.
들어가서 우리가 필요한것들을 입력한다.
(ex. react node)
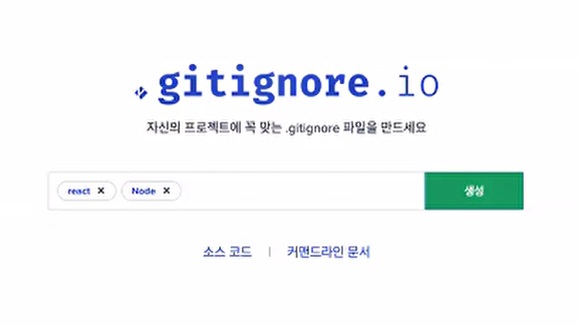
그럼 쟤가 필요없는 것들을 생성해준다.
# Created by https://www.toptal.com/developers/gitignore/api/react,node
# Edit at https://www.toptal.com/developers/gitignore?templates=react,node

### Node ###
# Logs
logs
*.log
npm-debug.log*
yarn-debug.log*
yarn-error.log*
lerna-debug.log*
.pnpm-debug.log*

# Diagnostic reports (https://nodejs.org/api/report.html)
report.[0-9]*.[0-9]*.[0-9]*.[0-9]*.json

# Runtime data
pids
*.pid
*.seed
*.pid.lock

# Directory for instrumented libs generated by jscoverage/JSCover
lib-cov

# Coverage directory used by tools like istanbul
coverage
*.lcov

# nyc test coverage
.nyc_output

# Grunt intermediate storage (https://gruntjs.com/creating-plugins#storing-task-files)
.grunt

# Bower dependency directory (https://bower.io/)
bower_components

# node-waf configuration
.lock-wscript

# Compiled binary addons (https://nodejs.org/api/addons.html)
build/Release

# Dependency directories
node_modules/
jspm_packages/

# Snowpack dependency directory (https://snowpack.dev/)
web_modules/

# TypeScript cache
*.tsbuildinfo

# Optional npm cache directory
.npm

# Optional eslint cache
.eslintcache

# Optional stylelint cache
.stylelintcache

# Microbundle cache
.rpt2_cache/
.rts2_cache_cjs/
.rts2_cache_es/
.rts2_cache_umd/

# Optional REPL history
.node_repl_history

# Output of 'npm pack'
*.tgz

# Yarn Integrity file
.yarn-integrity

# dotenv environment variable files
.env
.env.development.local
.env.test.local
.env.production.local
.env.local

# parcel-bundler cache (https://parceljs.org/)
.cache
.parcel-cache

# Next.js build output
.next
out

# Nuxt.js build / generate output
.nuxt
dist

# Gatsby files
.cache/
# Comment in the public line in if your project uses Gatsby and not Next.js
# https://nextjs.org/blog/next-9-1#public-directory-support
# public

# vuepress build output
.vuepress/dist

# vuepress v2.x temp and cache directory
.temp

# Docusaurus cache and generated files
.docusaurus

# Serverless directories
.serverless/

# FuseBox cache
.fusebox/

# DynamoDB Local files
.dynamodb/

# TernJS port file
.tern-port

# Stores VSCode versions used for testing VSCode extensions
.vscode-test

# yarn v2
.yarn/cache
.yarn/unplugged
.yarn/build-state.yml
.yarn/install-state.gz
.pnp.*

### Node Patch ###
# Serverless Webpack directories
.webpack/

# Optional stylelint cache

# SvelteKit build / generate output
.svelte-kit

### react ###
.DS_*
**/*.backup.*
**/*.back.*

node_modules

*.sublime*

psd
thumb
sketch

# End of https://www.toptal.com/developers/gitignore/api/react,node
이걸 다 복사해서 .gitignore에 붙여준다.
그럼 node_module의 파일명 색깔이 변할거다.(비활성화색깔)
이제 github가서 레포지터리를 만들고
git remote -v
git remote add origin 주소
git remote -v
git add .
git commit -m "dfdfdfdfdf"
git status
git push -u origin master
다 올라간게 깃헙에서 확인되면
깃헙사이트에서 settings들어가서 좌측메뉴에서 pages -> branch를 none말고 master설정. root말고 docs설정. 그리고 save클릭.
URL은
mongzii.github.io/레포지토리이름
이렇게 하면 된다.
근데 배포를 막 한 직후에는 안떠서 5분정도 기다려야 보인다.
< 작동모드설정 >
mode는 none, development, production이 있다.
none은 어떤 모드도 적용 안하겠다는 거다.
아무모드도 설정 안해주면 production이라고 적용된다.
< Output관리 >
module.exports = {
    entry: './src/index.js',              //시작하는 지점
    output: {
        path : path.resolve(__dirname, 'docs'),
        filename: "app.bundle.js"
    },
    }
저렇게 되어있던걸
module.exports = {
    entry: './src/index.js',              //시작하는 지점
    output: {
        path : path.resolve(__dirname, 'docs'),
        filename: "[name].bundle.js",
        clean: true
    },
    }
이렇게 하면 웹팩이 다른 이름으로 알아서 지정해준다.
이때 clean: true를 추가하면 그전에 있던 것들은 알아서 청소가 되게 된다.
bundle부분도 hash라고 바꿀수있다.
module.exports = {
    entry: './src/index.js',              //시작하는 지점
    output: {
        path : path.resolve(__dirname, 'docs'),
        filename: "[name].[hash].js",
        clean: true
    },
    }
< asset관리 >
npm install -D mini-css-extract-plugin css-minimizer-webpack-plugin이제 use에 써있던 style-loader는 필요가 없다.
밑의 코드 넣어주면 된다.
const MiniCssExtractPlugin = require("mini-css-extract-plugin");
const CssMinimizerPlugin = require("css-minimizer-webpack-plugin");

use: ["MiniCssExtractPlugin.loader", "css-loader"]

new MiniCssExtractPlugin()

optimization: {
        minimizer: [
            new CssMinimizerPlugin()
        ]
    }
const path = require("path");
const HtmlWebpackPlugin = require("html-webpack-plugin");
const MiniCssExtractPlugin = require("mini-css-extract-plugin");
const CssMinimizerPlugin = require("css-minimizer-webpack-plugin");
module.exports = {
entry: './src/index.js', //시작하는 지점
output: {
path : path.resolve(__dirname, 'docs'),
filename: "[name].bundle.js",
clean: true
},
module: {
rules: [
{
test: /\.js$/,
exclude: /node_modules/,
use: {
loader: "babel-loader",
options: {
presets: [
["@babel/preset-env"],
["@babel/preset-react", {runtime: "automatic"}] //runtime저거는 거의 필수옵션. 저거 안하면 하얀백지나올거다.
]
}
}
},
{
test: /\.css$/,
exclude: /node_modules/,
use: [MiniCssExtractPlugin.loader, "css-loader"]
}
]
},
plugins: [
new HtmlWebpackPlugin({
template: path.resolve(__dirname, "public", "index.html")
}),
new MiniCssExtractPlugin()
],
optimization: {
minimizer: [
new CssMinimizerPlugin()
]
}
}이렇게 하고나면 main.css가 생성된다.
이상 뒷부분은 나중에 쓸때 찾아봐야겟다. 너무 많아서 힘들다 ㅠㅠㅠ
'부트캠프교육중 > react' 카테고리의 다른 글
| Virtual DOM (0) | 2023.03.22 |
|---|---|
| 웹팩 과제하다가 살짝정리한거 (0) | 2023.03.21 |
| 리액트와 웹팩 (0) | 2023.03.21 |
| 웹팩의 핵심 개념 (0) | 2023.03.20 |
| 웹팩 Webpack (0) | 2023.03.20 |
